Bongo Parts
Contents


You’re going to want to know the bongo parts before you start digging in to any of the lessons. These terms will be used often throughout various drum lessons and online exercises, so the better you know them, the easier it will be to learn.
There really isn’t too much to the bongo drums, so it shouldn’t take long to cover the material, but I’ll lay out the basic terms below.
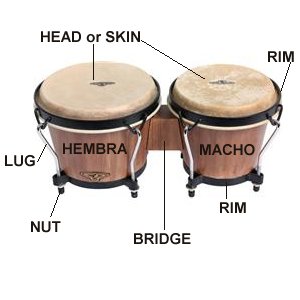
Diagram of Bongo Parts

The larger diameter drum is called the Hembra, while the smaller is Macho. At first these names confused me because when I hear the word “macho” I think big and strong. Well I was wrong. It happens.
These terms will be used often in the exercises and if you confuse them (like I did), you will play rhythms and patterns the wrong way.
The heads, or skins, are what you strike with your hands to produce sound. From time to time, these may break and you’ll have to purchase replacement bongo heads.
Higher end bongo heads are much thicker than the low end lines and should last you much longer.
There are two different rims, an upper and a lower that are used along with the lugs and nuts to help you tune the drums. I cover these parts more in depth in the lesson on tuning bongos.
Now that you have a good overview of the parts of the bongo, you’re ready to start the lessons.
Take me to the Bongo Lessons!


New! Comments
Leave your comments below.